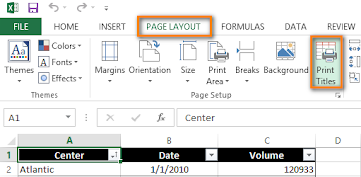
- Select the cells: Click and drag to select the range of cells you want to print.
- Go to Page Layout tab: Click on the "Page Layout" tab in the Excel ribbon.
- Choose Print Area: In the "Page Setup" group, click on "Print Area".
- Set Print Area: Select "Set Print Area" from the dropdown menu.
- Preview and print: Go to "File" > "Print" to preview and then print the selected area.
- Multiple print areas: You can set multiple print areas on a worksheet by holding down the Ctrl key and clicking on the areas you want to print. Each print area will be printed on its own page.
- Clear print area: To remove a print area, go to "Print Area" > "Clear Print Area".
- Print entire worksheet: To print the entire worksheet, ensure no print area is set.
- Open Page Setup: Go to the "Page Layout" tab on the ribbon, then click "Print Titles" in the "Page Setup" group.
- Sheet Tab: In the "Page Setup" dialog box, select the "Sheet" tab.
- Rows to Repeat at Top: In the "Print titles" section, enter the reference of the rows containing the column labels. For example, if you want to print the first row on every page, enter "$1:$1".
- Columns to Repeat at Left: Similarly, enter the reference of the columns containing the row labels. If you want to print column A on every page, enter "$1:$1".
- Confirm and Print: Click "OK" to apply the settings, and then print the worksheet.
- 1. Define the Purpose and Scope:
- What data will the template track?
- Who will use the template?
- What are the key insights or actions users need to extract from the data?
- Are there any specific formulas or calculations needed?
2. Structure and Organization:- Organize data into logical sections or tabs.
- Use clear and descriptive headers for columns and rows.
- Consider using different colors or formatting to highlight important information.
- Freeze panes to keep headers visible while scrolling.
- Add comments or notes to explain complex formulas or calculations.
- Use a consistent style throughout the template.
3. Formatting for Readability:- Choose a readable font and size.
- Use consistent formatting for numbers, dates, and text.
- Use borders to separate sections or data ranges.
- Consider using conditional formatting to highlight specific data points.
4. Saving as a Template:- Open the workbook.
- Click "File" > "Save As".
- Choose a location to save the template.
- In the "Save as type" dropdown, select "Excel Template (.xltx)".*
- Click "Save".
5. Advanced Features (Optional):- Add VBA code for automation or custom functions.
- Insert shapes, images, or charts to enhance the template's visual appeal.
- Create dropdown lists or validation rules to ensure data accuracy.
- Use Excel's built-in tools for data analysis, such as pivot tables or charts.
- Consider using data validation to restrict the type of data that can be entered into a cell.
- Use comments to provide instructions or explanations to users.
You can add headers or footers at the top or bottom of a printed worksheet in Excel. For example, you might create a footer that has page numbers, the date, and the name of your file. You can create your own, or use many built-in headers and footers.
Headers and footers are displayed only in Page Layout view, Print Preview, and on printed pages. You can also use the Page Setup dialog box if you want to insert headers or footers for more than one worksheet at a time. For other sheet types, such as chart sheets, or charts, you can insert headers and footers only by using the Page Setup dialog box.
Add or change headers or footers in Page Layout viewSelect the worksheet where you want to add or change headers or footers.
Go to Insert > Header & Footer.
To add or edit a header or footer, select the left, center, or right header or footer text box at the top or the bottom of the worksheet page (under Header, or above Footer).
Type the new header or footer text.
Customizing Headers & Footers.


No comments:
Post a Comment
Welcome to saveracom.blogspot.com